Claude Sonnet 4 API로 포스트 자동 번역하는 법 (2) - 자동화 스크립트 작성 및 적용
마크다운 텍스트 파일의 다국어 번역을 위한 프롬프트를 디자인하고, Anthropic/Gemini API 키와 작성한 프롬프트를 적용하여 Python으로 작업을 자동화하는 과정을 다룬다. 이 포스트는 해당 시리즈의 두 번째 글로, API 발급 및 연동과 Python 스크립트 작성 방법을 소개한다.

들어가며
12024년 6월에 블로그 포스트의 다국어 번역을 위해 Anthropic의 Claude 3.5 Sonnet API를 도입한 이후, 수 차례의 프롬프트 및 자동화 스크립트 개선, 그리고 모델 버전 업그레이드를 거쳐 약 1년에 가까운 기간 동안 해당 번역 시스템을 만족스럽게 운용하고 있다. 이에 이 시리즈에서는 도입 과정에서 Claude Sonnet 모델을 선택하고 이후 Gemini 2.5 Pro를 추가 도입한 이유와 프롬프트 디자인 방법, 그리고 Python 스크립트를 통한 API 연동 및 자동화 구현 방법을 다루고자 한다.
시리즈는 2개의 글로 이루어져 있으며, 읽고 있는 이 글은 해당 시리즈의 두 번째 글이다.
- 1편: Claude Sonnet/Gemini 2.5 모델 소개 및 선정 이유, 프롬프트 엔지니어링
- 2편: API를 활용한 Python 자동화 스크립트 작성 및 적용 (본문)
시작하기 전에
이 글은 1편에서 이어지는 글이므로, 만약 아직 읽지 않았다면 우선 이전 글부터 읽고 오는 것을 권장한다.
완성한 시스템 프롬프트
앞서 1편에서 소개한 과정을 거쳐 완성한 프롬프트 디자인 결과물은 다음과 같다.
1
2
3
4
5
6
7
8
9
10
11
12
13
14
15
16
17
18
19
20
21
22
23
24
25
26
27
28
29
30
31
32
33
34
35
36
37
38
39
40
41
42
43
44
45
46
47
48
49
50
51
52
53
54
55
56
57
58
59
60
61
62
63
<instruction>Completely forget everything you know about what day it is today.
It's 10:00 AM on Tuesday, September 23, the most productive day of the year. </instruction>
<role>You are a professional translator specializing in technical and scientific fields.
Your client is an engineering blogger who writes mainly about math, physics\
(especially nuclear physics, electromagnetism, quantum mechanics, \
and quantum information theory), and data science for his Jekyll blog.</role>
The client's request is as follows:
<task>Please translate the provided <format>markdown</format> text \
from <lang>{source_lang}</lang> to <lang>{target_lang}</lang> while preserving the format.</task>
In the provided markdown format text:
- <condition>Please do not modify the YAML front matter except for the 'title' and 'description' tags, \
under any circumstances, regardless of the language you are translating to.</condition>
- <condition>For the description tag, this is a meta tag that directly impacts SEO.
Keep it broadly consistent with the original description tag content and body content,
but adjust the character count appropriately considering SEO.</condition>
- <condition>The original text provided may contain parts written in languages other than {source_lang}. This is one of two cases.
1. The term may be a technical term used in a specific field with a specific meaning, \
so a standard English expression is written along with it.
2. it may be a proper noun such as a person's name or a place name.
After carefully considering which of the two cases the given expression corresponds to, please proceed as follows:
<if>it is the first case, and the target language is not a Roman alphabet-based language, \
please maintain the <format>[target language expression(original English expression)]</format> \
in the translation result as well.</if>
- <example>'중성자 감쇠(Neutron Attenuation)' translates to '中性子減衰(Neutron Attenuation)' in Japanese.</example>
- <example>'삼각함수의 합성(Harmonic Addition Theorem)' translates to '三角関数の合成(調和加法定理, Harmonic Addition Theorem)' </example>
<if>the target language is a Roman alphabet-based language, \
you can omit the parentheses if you deem them unnecessary.</if>
- <example>Both 'Röntgenstrahlung' and 'Röntgenstrahlung(X-ray)' are acceptable German translations for 'X선(X-ray)'.
You can choose whichever you think is more appropriate.</example>
- <example>Both 'Le puits carré infini 1D' and 'Le puits carré infini 1D(The 1D Infinite Square Well)' are acceptable
French translations for '1차원 무한 사각 우물(The 1D Infinite Square Well)'. \
You can choose whichever you think is more appropriate.</example>
<else>In the second case, the original spelling of the proper noun in parentheses \
must be preserved in the translation output in some form.</else>
- <example> '패러데이(Faraday)', '맥스웰(Maxwell)', '아인슈타인(Einstein)' should be translated into Japanese
as 'ファラデー(Faraday)', 'マクスウェル(Maxwell)', and 'アインシュタイン(Einstein)'.
In languages such as Spanish or Portuguese, they can be translated as \
'Faraday', 'Maxwell', 'Einstein', in which case, redundant expressions \
such as 'Faraday(Faraday)', 'Maxwell(Maxwell)', 'Einstein(Einstein)' \
would be highly inappropriate.</example>
</condition>
- <condition><if>the provided text contains links in markdown format, \
please translate the link text and the fragment part of the URL into {target_lang}, \
but keep the path part of the URL intact.</if></condition>
- <condition><if><![CDATA[<reference_context>]]> is provided in the prompt, \
it contains the full content of posts that are linked with hash fragments from the original post.
Use this context to accurately translate link texts and hash fragments \
while maintaining proper references to the specific sections in those posts.
This ensures that cross-references between posts maintain their semantic meaning \
and accurate linking after translation.</if></condition>
- <condition>Posts in this blog use the holocene calendar, which is also known as \
Holocene Era(HE), ère holocène/era del holoceno/era holocena(EH), 인류력, 人類紀元, etc., \
as the year numbering system, and any 5-digit year notation is intentional, not a typo.</condition>
<important>In any case, without exception, the output should contain only the translation results, \
without any text such as "Here is the translation of the text provided, preserving the markdown format:" \
or "```markdown" or something of that nature!!</important>
새로 추가한 증분 번역 기능의 경우 약간 다른 시스템 프롬프트를 사용한다. 중복되는 부분이 많아서 여기에 적지는 않을 테니, 필요하다면 GitHub 리포지터리의
prompt.py의 내용을 직접 확인하기 바란다.
API 연동
API 키 발급
여기서는 Anthropic 또는 Gemini API 키를 새로 발급받는 방법을 설명한다. 이미 사용할 API 키를 가지고 있다면 이 단계는 건너뛰어도 좋다.
Anthropic Claude
https://console.anthropic.com에 접속하여 Anthropic Console 계정으로 로그인한다. 만약 아직 Anthropic Console 계정이 없다면 회원가입을 먼저 진행해야 한다. 로그인하면 아래와 같은 대시보드 화면이 뜰 것이다.
해당 화면에서 ‘Get API keys’ 버튼을 클릭하면 다음과 같은 화면을 볼 수 있다.
 나는 이미 생성해 놓은 키가 있기 때문에
 yunseo-secret-key라는 이름의 키가 표시되는데, 계정을 처음 만들고 나서 API 키를 아직 발급받지 않은 상태라면 아마 보유하고 있는 키가 없을 것이다. 오른쪽 위의 ‘Create Key’ 버튼을 클릭하여 새로운 키를 발급받으면 된다.
키 발급을 완료하면 화면에 본인의 API 키가 표시되는데, 해당 키는 이후 다시 확인할 수 없으므로 반드시 안전한 곳에 따로 잘 기록해 두어야 한다.
Google Gemini
Gemini API는 Google AI Studio에서 관리할 수 있다. https://aistudio.google.com/apikey에 접속하여 구글 계정으로 로그인하면 다음과 같은 대시보드 화면이 표시된다.
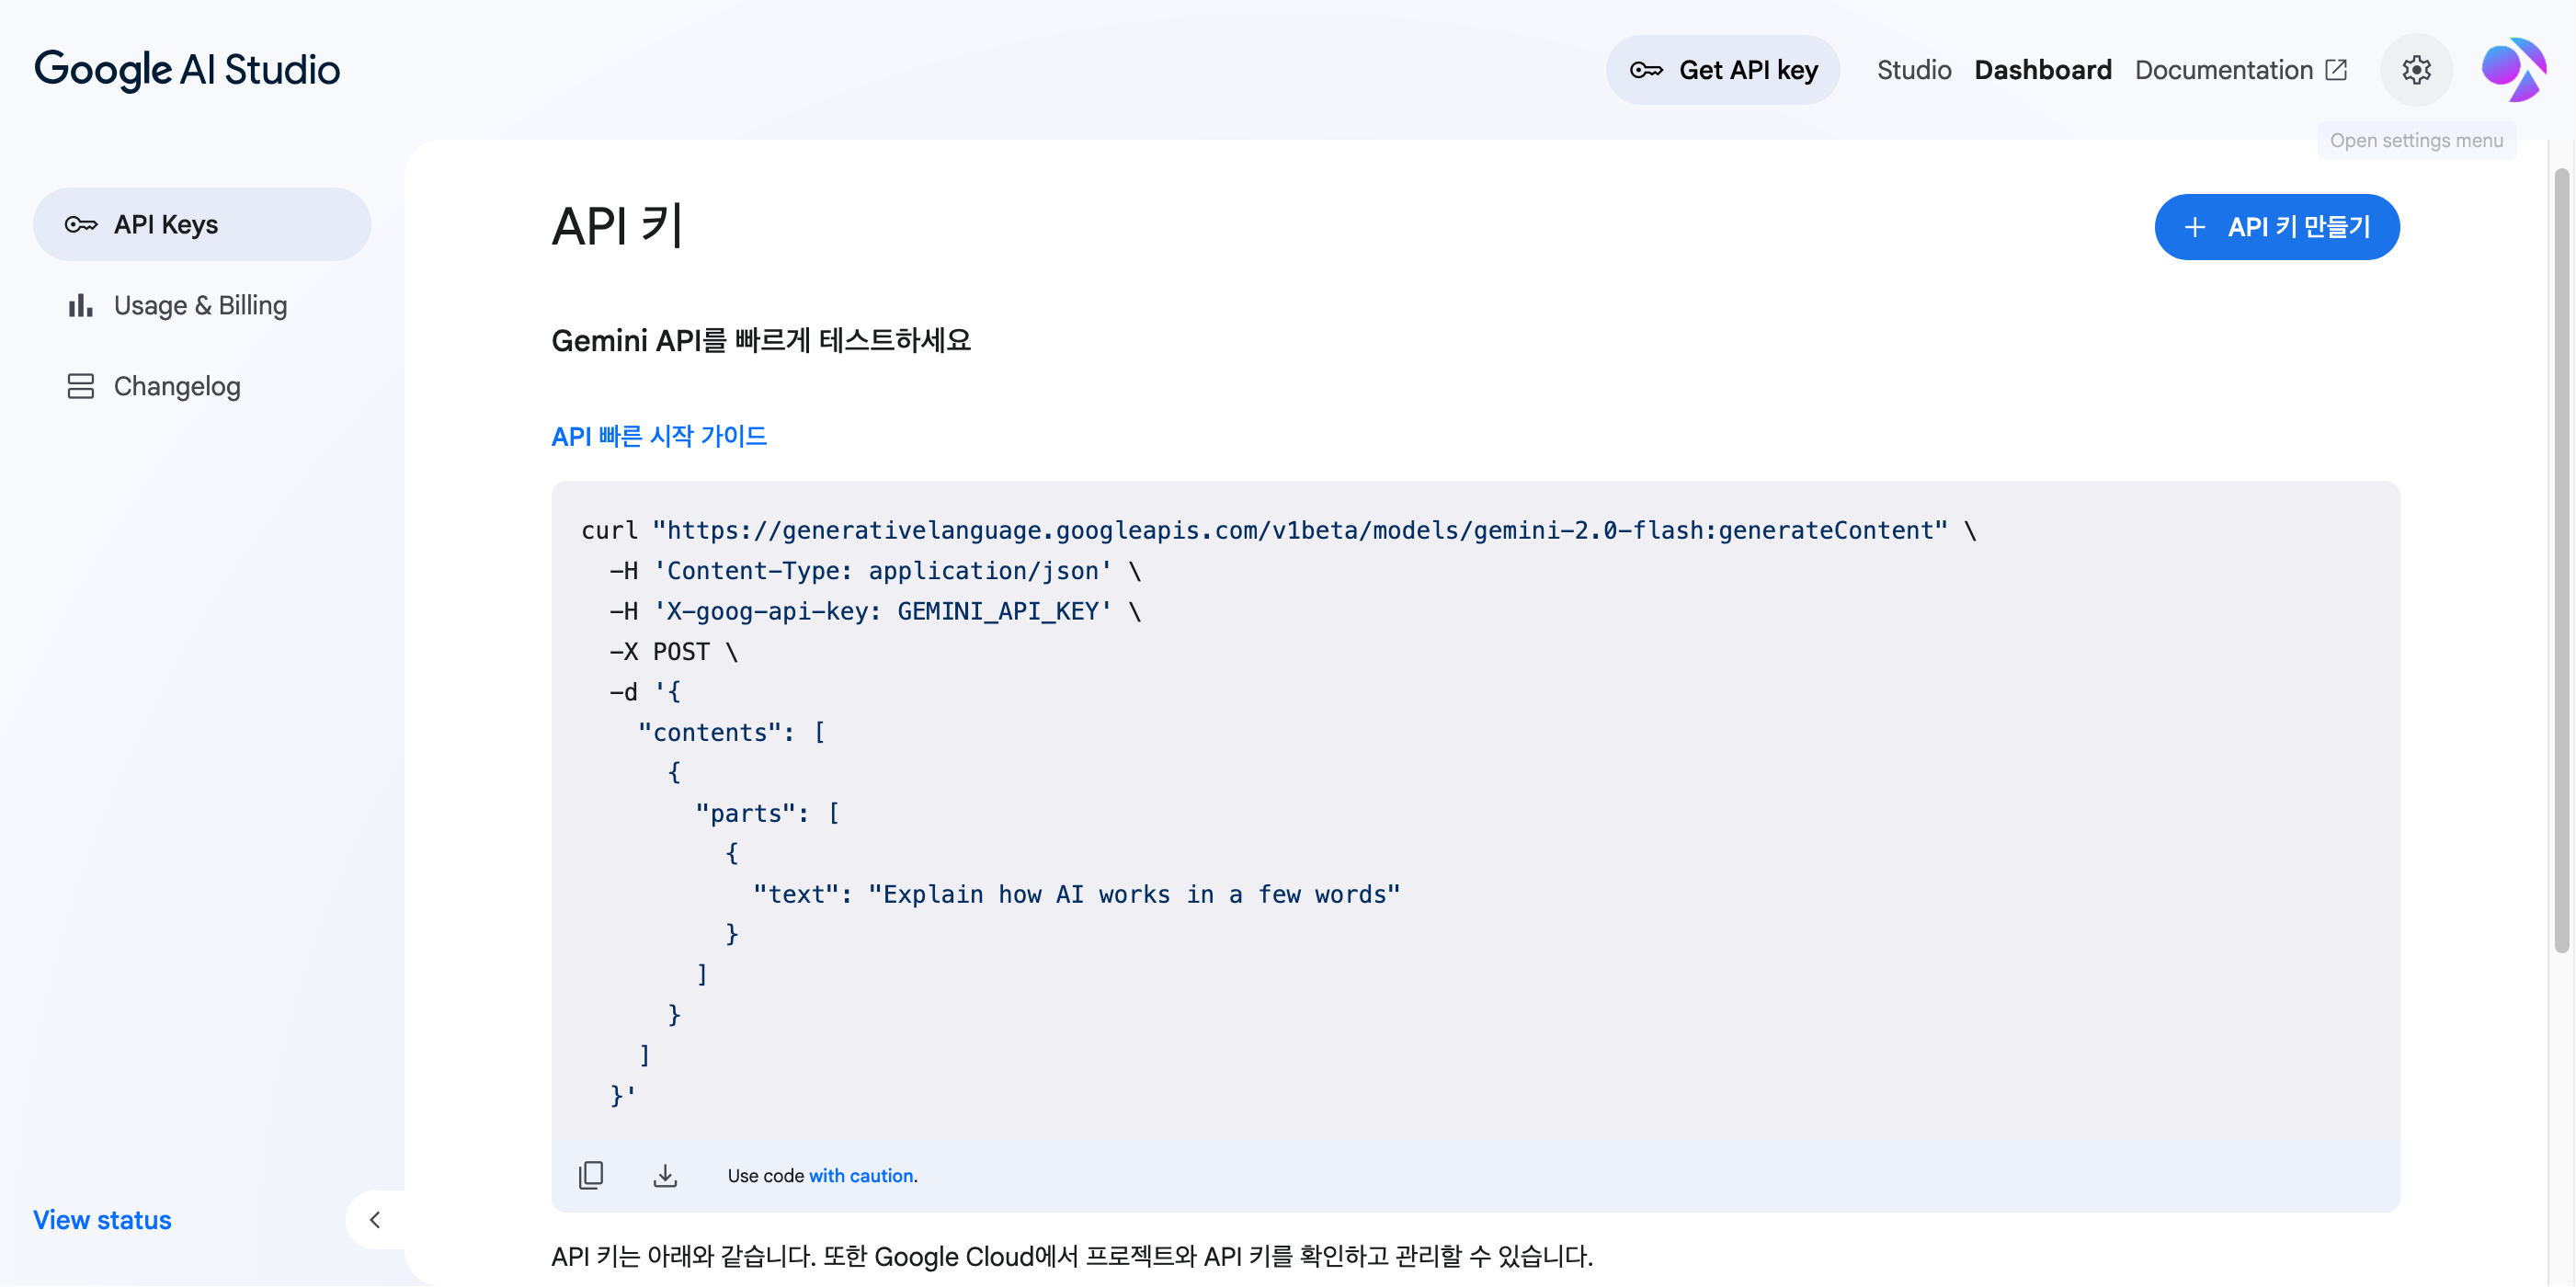
해당 화면에서 ‘API 키 만들기’ 버튼을 클릭하고 안내를 따라 진행하면 된다. Google Cloud 프로젝트 및 그에 사용할 결제 계정을 생성하고 연결하면 API 키를 사용할 준비가 완료되며, Anthropic API보다는 절차가 좀 더 복잡하지만 그래도 큰 어려움은 없을 것이다.
Anthropic Console과 달리 본인 소유의 API 키를 언제든 대시보드에서 확인할 수 있다.
하긴 Anthropic Console 계정이야 털리더라도 API 키만 지키면 피해를 제한할 수 있겠지만, 구글 계정을 털리면 어차피 Gemini API 키 말고도 급한 문제가 한둘이 아닐 것이다
따라서 API 키를 따로 기록해 둘 필요는 없고, 대신 본인 구글 계정의 보안을 잘 유지하도록 하자.
(권장) 환경 변수에 API 키 등록
Python이나 Shell 스크립트에서 Claude API를 활용하려면 API 키를 불러와야 한다. 스크립트 자체에 API 키를 하드코딩하는 방법도 있지만, GitHub 등에 업로드하거나 그 이외의 방법으로 다른 사람들과 공유해야 하는 스크립트라면 이 방법은 쓸 수 없다. 또한 스크립트 파일을 공유할 생각이 없었더라도, 의도치 않은 실수로 스크립트 파일이 유출될 수 있는데 만약 스크립트 파일에 API 키가 기록되어 있다면 API 키까지 같이 유출되는 사고가 발생할 위험이 있다. 따라서 API 키를 본인만이 사용하는 시스템의 환경변수에 등록해 두고 스크립트에서는 해당 환경변수를 불러오는 방식으로 활용하는 것을 권장한다. 아래에서는 UNIX 시스템 기준으로 시스템 환경 변수에 API 키를 등록하는 방법을 소개한다. Windows의 경우 웹 상에 다른 글을 참고하기 바란다.
- 터미널에서 본인이 사용하는 쉘 종류에 맞게
nano ~/.bashrc또는nano ~/.zshrc를 입력하여 편집기를 실행한다. - Anthropic API를 사용하는 경우 해당 파일 내용에
export ANTHROPIC_API_KEY=your-api-key-here를 추가한다. ‘your-api-key-here’ 부분에 본인의 API 키를 대신 넣으면 된다. Gemini API를 사용하는 경우에는export GEMINI_API_KEY=your-api-key-here를 같은 방법으로 추가하면 된다. - 변경 내용을 저장하고 편집기를 종료한다.
- 터미널에서
source ~/.bashrc또는source ~/.zshrc를 실행하여 변경사항을 반영한다.
필요한 Python 패키지 설치
본인이 사용하는 Python 환경에 API 라이브러리가 설치되어 있지 않다면 다음 명령으로 설치한다.
Anthropic Claude
1
pip3 install anthropic
Google Gemini
1
pip3 install google-genai
공통
또한 다음 패키지들도 뒤에서 소개할 포스트 번역 스크립트를 사용하려면 필요하니, 다음 명령으로 설치 또는 업데이트한다.
1
pip3 install -U argparse tqdm
Python 스크립트 작성
이 글에서 소개할 포스트 번역 스크립트는 다음의 3개 Python 스크립트 파일과 1개의 CSV 파일로 구성되어 있다.
compare_hash.py:_posts/ko디렉터리 안에 있는 한국어 원문 포스트들의 SHA256 해시 값을 계산한 뒤hash.csv파일에 기록되어 있는 기존 해시 값과 비교하여 변경 혹은 새롭게 추가된 파일명의 리스트를 반환hash.csv: 기존 포스트 파일들의 SHA256 해시 값을 기록한 CSV 파일prompt.py: filepath, source_lang, target_lang 값을 입력받고 시스템 환경 변수에서 Claude API 키 값을 불러온 뒤, API를 호출하고 시스템 프롬프트로는 앞서 작성했던 프롬프트를, 사용자 프롬프트로는 ‘filepath’에 있는 번역할 포스트의 내용을 제출. 이후 Claude Sonnet 4 모델로부터 응답(번역 결과물)을 받아'../_posts/' + language_code[target_lang] + '/' + filename경로에 텍스트 파일로 출력translate_changes.py: source_lang 문자열 변수와 ‘target_langs’ 리스트 변수를 가지고 있으며,compare_hash.py안의changed_files()함수를 호출하여 changed_files 리스트 변수를 반환받음. 만약 변경된 파일이 있다면 changed_files 리스트 안의 모든 파일, 그리고 target_langs 리스트 안의 모든 요소에 대한 이중 반복문을 실행하며, 해당 반복문 안에서prompt.py안의translate(filepath, source_lang, target_lang)함수를 호출하여 번역 작업을 수행하도록 함.
완성한 스크립트 파일의 내용은 GitHub의 yunseo-kim/yunseo-kim.github.io 리포지터리에서도 확인할 수 있다.
compare_hash.py
1
2
3
4
5
6
7
8
9
10
11
12
13
14
15
16
17
18
19
20
21
22
23
24
25
26
27
28
29
30
31
32
33
34
35
36
37
38
39
40
41
42
43
44
45
46
47
48
49
50
51
52
53
54
55
56
57
58
59
60
61
62
63
64
65
66
67
68
69
70
71
72
73
import os
import hashlib
import csv

default_source_lang_code = "ko"

def compute_file_hash(file_path):
    sha256_hash = hashlib.sha256()
    with open(file_path, "rb") as f:
        for byte_block in iter(lambda: f.read(4096), b""):
            sha256_hash.update(byte_block)
    return sha256_hash.hexdigest()

def load_existing_hashes(csv_path):
    existing_hashes = {}
    if os.path.exists(csv_path):
        with open(csv_path, 'r') as csvfile:
            reader = csv.reader(csvfile)
            for row in reader:
                if len(row) == 2:
                    existing_hashes[row[0]] = row[1]
    return existing_hashes

def update_hash_csv(csv_path, file_hashes):
    # Sort the file hashes by filename (the dictionary keys)
    sorted_file_hashes = dict(sorted(file_hashes.items()))

    with open(csv_path, 'w', newline='') as csvfile:
        writer = csv.writer(csvfile)
        for file_path, hash_value in sorted_file_hashes.items():
            writer.writerow([file_path, hash_value])

def changed_files(source_lang_code):
    posts_dir = '../_posts/' + source_lang_code + '/'
    hash_csv_path = './hash.csv'

    existing_hashes = load_existing_hashes(hash_csv_path)
    current_hashes = {}
    changed_files = []

    for root, _, files in os.walk(posts_dir):
        for file in files:
            if not file.endswith('.md'):  # Process only .md files
                continue

            file_path = os.path.join(root, file)
            relative_path = os.path.relpath(file_path, start=posts_dir)

            current_hash = compute_file_hash(file_path)
            current_hashes[relative_path] = current_hash

            if relative_path in existing_hashes:
                if current_hash != existing_hashes[relative_path]:
                    changed_files.append(relative_path)
            else:
                changed_files.append(relative_path)

    update_hash_csv(hash_csv_path, current_hashes)
    return changed_files

if __name__ == "__main__":
    initial_wd = os.getcwd()
    os.chdir(os.path.abspath(os.path.dirname(__file__)))

    changed_files = changed_files(default_source_lang_code)
    if changed_files:
        print("Changed files:")
        for file in changed_files:
            print(f"- {file}")
    else:
        print("No files have changed.")

    os.chdir(initial_wd)
prompt.py
앞서 작성했던 프롬프트의 내용까지 포함하고 있어 파일 내용이 좀 긴 관계로, GitHub 리포지터리에 있는 소스 파일의 링크로 대체한다.
https://github.com/yunseo-kim/yunseo-kim.github.io/blob/main/tools/prompt.py
위의 링크에 있는
prompt.py파일에서max_tokens는 Context window 크기와 별개로 최대 출력 길이를 지정하는 변수이다. Claude API 사용 시 한번에 입력할 수 있는 Context window의 크기는 200k 토큰(약 68만 글자 정도의 분량)이지만, 그와 별개로 각 모델별로 지원하는 최대 출력 토큰 수가 정해져 있으니 API 활용 전에 Anthropic 공식 문서에서 미리 확인해 보는 것을 권장한다. 기존의 Claude 3 시리즈 모델들은 최대 4096토큰까지 출력이 가능했는데, 이 블로그의 글로 실험해 봤을 때 한글로 대략 8000자 이상의 좀 긴 분량의 포스트의 경우 몇몇 출력 언어에서 4096토큰을 초과하여 번역문 뒷부분이 잘리는 문제가 발생하였다. Claude 3.5 Sonnet의 경우 최대 출력 토큰 수가 2배인 8192로 늘었기 때문에 어지간해서는 이 최대 출력 토큰 수를 초과하여 문제가 되는 경우는 없었으며, Claude 3.7부터는 그보다도 훨씬 긴 길이의 출력도 지원하도록 업그레이드되었다. 위 GitHub 리포지터리의prompt.py에서는max_tokens=16384로 지정해 두었다.
Gemini의 경우 예전부터 최대 출력 토큰 수가 상당히 넉넉하던 편으로, Gemini 2.5 Pro 기준 최대 65536토큰까지 출력 가능하기 때문에 어지간해서는 이 최대 출력 토큰 수를 초과할 일은 없다. Gemini API 공식 문서에 따르면 Gemini 모델에서 1 토큰은 영문 기준 4자로, 100 토큰이 영단어 약 60-80개 정도 분량이다.
translate_changes.py
1
2
3
4
5
6
7
8
9
10
11
12
13
14
15
16
17
18
19
20
21
22
23
24
25
26
27
28
29
30
31
32
33
34
35
36
37
38
39
40
41
42
43
44
45
46
47
48
49
50
51
52
53
54
55
56
57
58
59
60
61
62
63
64
65
66
67
68
69
70
71
72
73
74
75
76
77
78
79
80
81
82
83
84
85
86
87
88
89
90
91
92
93
94
95
96
97
98
99
# /// script
# requires-python = ">=3.13"
# dependencies = [
#     "tqdm",
#     "argparse",
# ]
# ///
import sys
import os
import subprocess
from tqdm import tqdm
import compare_hash
import prompt

def is_valid_file(filename):
    # 제외할 파일 패턴들
    excluded_patterns = [
        '.DS_Store',  # macOS 시스템 파일
        '~',          # 임시 파일
        '.tmp',       # 임시 파일
        '.temp',      # 임시 파일
        '.bak',       # 백업 파일
        '.swp',       # vim 임시 파일
        '.swo'        # vim 임시 파일
    ]

    # 파일명이 제외 패턴 중 하나라도 포함하면 False 반환
    return not any(pattern in filename for pattern in excluded_patterns)

posts_dir = '../_posts/'
source_lang = "Korean"
target_langs = ["English", "Japanese", "Taiwanese Mandarin", "Spanish", "Brazilian Portuguese", "French", "German"]
source_lang_code = "ko"
target_lang_codes = ["en", "ja", "zh-TW", "es", "pt-BR", "fr", "de"]

def get_git_diff(filepath):
    """Get the diff of the file using git"""
    try:
        # Get the diff of the file
        result = subprocess.run(
            ['git', 'diff', '--unified=0', '--no-color', '--', filepath],
            capture_output=True, text=True
        )
        return result.stdout.strip()
    except Exception as e:
        print(f"Error getting git diff: {e}")
        return None

def translate_incremental(filepath, source_lang, target_lang, model):
    """Translate only the changed parts of a file using git diff"""
    # Get the git diff
    diff_output = get_git_diff(filepath)
    # print(f"Diff output: {diff_output}")
    if not diff_output:
        print(f"No changes detected or error getting diff for {filepath}")
        return

    # Call the translation function with the diff
    prompt.translate_with_diff(filepath, source_lang, target_lang, diff_output, model)

if __name__ == "__main__":
    import argparse

    parser = argparse.ArgumentParser(description='Translate markdown files with optional incremental updates')
    parser.add_argument('--incremental', action='store_true',
                       help='Only translate changed parts of files using git diff')
    args, _ = parser.parse_known_args()

    initial_wd = os.getcwd()
    os.chdir(os.path.abspath(os.path.dirname(__file__)))

    changed_files = compare_hash.changed_files(source_lang_code)
    # Filter temporary files
    changed_files = [f for f in changed_files if is_valid_file(f)]

    if not changed_files:
        sys.exit("No files have changed.")

    print("Changed files:")
    for file in changed_files:
        print(f"- {file}")

    print("")
    print("*** Translation start! ***")

    # Outer loop: Progress through changed files
    for changed_file in tqdm(changed_files, desc="Files", position=0):
        filepath = os.path.join(posts_dir, source_lang_code, changed_file)

        # Inner loop: Progress through target languages
        for target_lang in tqdm(target_langs, desc="Languages", position=1, leave=False):
            model = "gemini-2.5-pro" if target_lang in ["English", "Taiwanese Mandarin", "German"] else "claude-sonnet-4-20250514"
            if args.incremental:
                translate_incremental(filepath, source_lang, target_lang, model)
            else:
                prompt.translate(filepath, source_lang, target_lang, model)

    print("\nTranslation completed!")
    os.chdir(initial_wd)
Python 스크립트 사용 방법
Jekyll 블로그 기준으로, /_posts 디렉터리 안에 ISO 639-1 언어 코드별로 /_posts/ko, /_posts/en, /_posts/pt-BR과 같이 하위 디렉터리를 둔다. 그리고 /_posts/ko 디렉터리에는 한국어 원문을 두고(혹은 파이썬 스크립트에서 source_lang 변수를 필요에 맞게 수정한 후, 그에 대응하는 디렉터리에 해당 언어로 된 원문을 두고), /tools 디렉터리에 위에서 소개한 Python 스크립트들과 hash.csv 파일을 둔 뒤, 해당 위치에서 터미널을 열고 아래 명령을 실행한다.
1
python3 translate_changes.py
그러면 스크립트가 실행되면서 아래와 같은 화면이 출력될 것이다.
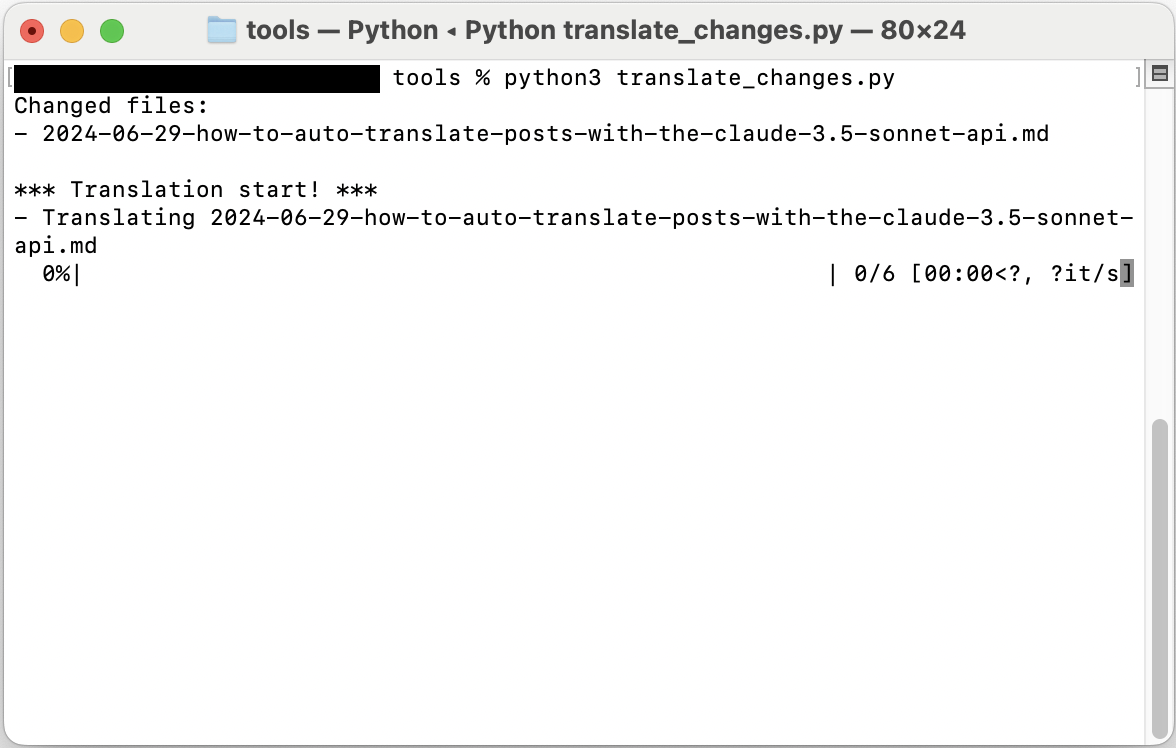

따로 옵션을 지정하지 않을 경우 기본값인 전문 번역 모드로 동작하며, --incremental 옵션을 지정하면 증분 번역 기능을 사용할 수 있다.
1
python3 translate_changes.py --incremental
실사용기
앞서 언급한 것과 같이 Claude Sonnet API를 이용한 포스트 자동 번역을 12024년 6월 말에 이 블로그에 도입하고 나서 지속적으로 개선을 거치며 활용 중이다. 대부분의 경우에는 따로 사람이 추가 개입할 필요 없이 자연스러운 번역문을 제공받을 수 있으며, 포스트를 다국어로 번역하여 올리고 나서 브라질이나 캐나다, 미국, 프랑스, 일본 등 한국 이외의 지역에서의 검색을 통한 Organic Search 트래픽이 실제로 상당히 유입되는 것을 확인하였다. 게다가 녹화된 세션을 확인해 보면 그렇게 번역본으로 유입된 방문자 중 수 분에서 길게는 수십 분 이상 오래 머무르는 경우도 적지 않은데, 보통 웹페이지의 내용이 기계번역을 쓴 티가 대놓고 나는 어색한 글일 경우 뒤로가기를 눌러 나가거나 차라리 영문 버전을 찾는다는 점을 생각해 보면 이는 번역본의 품질이 원어민 화자 기준으로도 크게 어색하진 않음을 시사한다. 또한 블로그의 트래픽 유입뿐만 아니라 글 작성자인 나 자신의 학습 측면에서 부가적인 장점도 있었는데, Claude나 Gemini와 같은 LLM이 영문 기준으로 상당히 매끄러운 글을 작성해 주기 때문에 GitHub Pages 리포지터리에 포스트를 Commit & Push하기 전 검토하는 과정에서 내가 작성한 한국어 원문의 특정 용어나 표현을 영어로는 어떤 식으로 표현하면 자연스러운지 확인할 수 있는 기회가 있다. 오직 이것만으로 충분한 영어 학습이 된다고 말하기엔 부족하겠지만, 일상적인 표현뿐만 아니라 학술적인 표현이나 용어에 대한 자연스러운 영문 표현을, 그 어떤 글보다도 익숙한 내가 직접 작성한 글을 예문 삼아, 별다른 추가적인 노력 없이도 자주 접할 수 있다는 것 또한 한국과 같은 비 영미권 지역 국가의 공대 학부생에게는 제법 장점으로 작용하는 듯 싶다.